Complete Guide to the Link Debugger Facebook Tool: Fix Sharing Previews
Picture this: You just finished writing an amazing blog post. You spent hours making sure the words were perfect. You are ready to share it with the world. You go to your Facebook page, paste the link, and wait for the magic to happen. But then, disaster strikes.
The image is missing, the title is from three years ago, or the description is just a bunch of random code. It is frustrating, right?
At Social Think, we see this happen all the time. We help businesses with social media strategy, analytics, and insights to drive real business results. We know that in the fast-paced world of social media marketing, you only have a split second to grab someone’s attention.
If your link preview looks broken or messy, people will scroll right past it. They won’t click, and they won’t read your great content.
That is why we are talking about a very special helper today: the link debugger Facebook tool. It might sound technical, but it is actually quite simple. It is the secret weapon for anyone who manages a Facebook page or shares content online.
In this guide, we will walk you through exactly how to fix those broken links. We will explain why Facebook saves the wrong image, how to force it to show the new information, and how to make sure every post looks perfect. We want to help you get the clicks you deserve.
Are you ready to fix your links? Let’s get started.
What Is the Facebook Link Debugger Tool?
The Facebook debugger, officially known as the Sharing Debugger, is a free tool provided by Meta (the company that owns Facebook). Think of it as a window into Facebook’s brain.
It lets you see exactly what Facebook sees when it looks at your website.
When you share a link on Facebook, a robot called the Facebook crawler visits your page. It scans your site to find a thumbnail image, a headline, and a description.
It takes this information, Facebook finds, and builds a link preview.
This is the card you see with the picture and text when you share a link.
Sometimes, the crawler gets confused. It might grab an old image because it remembers the last time it visited. Or, it might miss the image entirely because the image size is wrong.
The Facebook debugger tool helps you see these errors so you can fix them.
How the Facebook Link Debugger Works For Link Previews?
To understand how this tool works, you need to know a little bit about Facebook’s cache. “Cache” is just a fancy word for memory storage.
When the Facebook crawler visits your web page, it takes a snapshot of your content. It saves this snapshot in its memory (cache). This way, the next time someone shares that same link, Facebook doesn’t have to go all the way back to your website to read it again.
It just shows the saved snapshot. This makes everything load faster. However, this causes problems when you make recent changes. If you update your featured image or change your headline, Facebook might still show the old snapshot from its cache.
The sharing debugger allows you to tell Facebook, “Hey, I changed something! Look at my page again.” When you use the tool, you force Facebook to clear its memory and look for the latest information.
Key Features of the Facebook Link Debugger
This tool does more than just clear the memory. It gives you a lot of useful details:
- Preview Generation: It shows you exactly how the shared link will look on the news feed.
- Error Reporting: It tells you if there are missing images or broken codes.
- Scraping Info: It tells you the exact time and date of the last scrape (the last time Facebook looked at your page).
- Tag Analysis: It lists all the raw open graph tags it found on your site (we will explain these later).
Step-by-Step: How to Use the Link Debugger For Facebook?
Using the Facebook sharing debugger is very easy. You do not need to be a computer wizard. Just follow these simple steps to fix your Facebook link previews.
- Grab the URL that’s Not Working: First, go to your website using your web browser. Navigate to the specific blog post or page that is giving you trouble. Go to the address bar at the top and copy the full URL of the content. Make sure you copy the whole thing, including the “https://” part.
- Access the Debugger Tool and Log In: Open a new tab and search for “Facebook Sharing Debugger” or go directly to the developer site. You will need to be logged into your Facebook account to use it. Don’t worry, it does not post anything to your profile. It just needs to know you are a real person.
- Paste in your Post’s URL: You will see a big text box on the screen. It usually says, “Enter a URL to see the information that is used when it is shared on Facebook.” Paste the URL of the page you copied in step 1 into this box.
- Click “Scrape Again”: Next to the text box, there is a blue debug button. Click it. If Facebook has never seen this link before, it might say, “This URL hasn’t been shared on Facebook before.” If you see this, click the button that says “Fetch new information.” If Facebook has seen the link before, it will show you the old data. Look for a button that says Scrape Again. This is the most important button. Clicking this commands the Facebook crawler to visit your site immediately and grab the latest content.
- Check the Preview: After you click Scrape Again, scroll down. You will see a section called “Link Preview.” This shows you the correct image, title, and description. Does it look right? If yes, great! You have fixed Facebook’s cache. Now, when you share that link on social media platforms, it will show the correct info.
- If the Preview isn’t Right, return to Your Website: Sometimes, clicking the button once isn’t enough. You might need to click Scrape Again a second time. If it is still showing the wrong image or incorrect metadata, the problem is likely on your website, not with Facebook. You will need to go back to your site settings to check your Open Graph meta tags.
Understanding Open Graph Meta Tags and Their Role in Facebook Sharing
You might be wondering, “How does Facebook know which image to pick?” It uses something called open graph tags (or OG tags).
Imagine your website is a house. The open graph tags are like the address plate and the welcome mat. They tell visitors (and robots) exactly what is inside.
Social Think specializes in optimizing these details because we know that accurate tags lead to better engagement rates.
If Facebook has to guess what your page is about, it often guesses wrong. These tags give Facebook clear instructions.
Essential Open Graph Tags For Accurate Link Previews
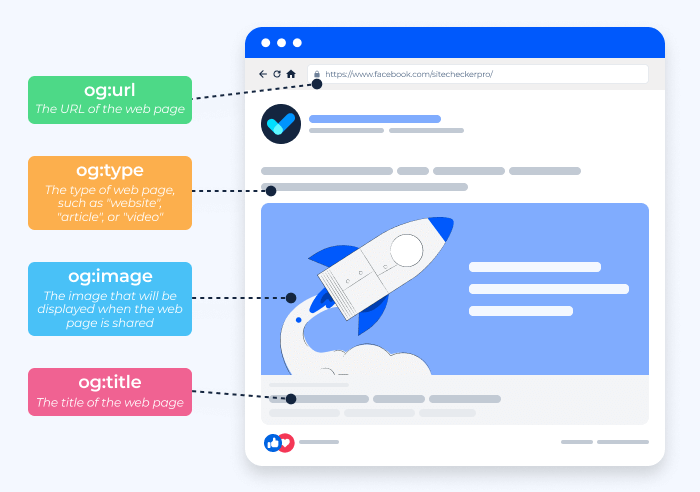
There are four main graph tags you need to worry about. If you use a tool like the Yoast SEO plugin on WordPress, these are easy to find.
- og:title: This is the headline of your article. It should be catchy and clear.
- og:description: This is a brief summary of the content. It appears under the headline.
- og:image: This is the image tag that points to your thumbnail. This is the most important one for visuals.
- og:url: This confirms the permanent address of the page.
When you use the sharing debugger tool, it looks for these specific labels in your website’s code.
How Open Graph Data Impacts Image and Title Display?
Without these tags, the Facebook crawler acts like a confused tourist.
It looks at all the images on your page—your logo, an ad in the sidebar, or a random icon—and tries to pick the best one. It often picks the wrong one.
When you define your Open Graph properties correctly, you are handing the crawler a map. You are saying, “Ignore the other pictures. THIS is the featured image.”
If you run a business, you want your Facebook post to look professional. Incorrect metadata makes your brand look sloppy. Using open graph data ensures that every shared link looks like a “rich object“—a fancy term for a nice-looking link card with a big picture and bold text.
Troubleshooting Common Errors with the Facebook Link Debugger
Even with the best tools, things can go wrong. Here are some common issues you might see in the Facebook debugger and how to fix issues quickly.
Fixing Missing Or Incorrect Thumbnails
This is the number one complaint. You updated the picture, but Facebook still shows the old one.
- Cause: This is usually a caching issue. Facebook is holding onto the old content.
- Fix: Paste your URL in the debugger tool and hit Scrape Again. Do it two or three times if needed.
- Advanced Fix: If that fails, check the file name of your image. If you uploaded a new image but kept the exact same file name (e.g., “image1.jpg”), Facebook might think it is the same picture. Rename your new image to something different (e.g., “image1-updated.jpg”) and upload it again. Then, update the URL of the content in the debugger.
Solving “Inferred Property” Warnings
Sometimes the debugger will give you a yellow warning that says “Inferred Property.”
- What it means: It means you didn’t provide a specific tag (like
og:image), so Facebook had to guess (infer) which one to use. - Fix: Go to your website editor or Yoast SEO settings. Make sure you have explicitly chosen a social media image for that specific post. Once you save the changes on your site, use the Facebook sharing debugger to scrape it again.
Handling “Server returned a non-200 response” Errors
This sounds scary, but it is usually simple.
- What it means: The Facebook crawler tried to visit your page, but hit a wall. It couldn’t load the page.
- Cause: Your site might be down, or your security settings are blocking Facebook bots.
- Fix: Check if your website loads in a regular web browser. If it works for you, check your firewall or security plugins. You want to make sure you are allowing the Facebook bot to access your website content.
Best Practices For Optimizing Links Before Using the Debugger

At Social Think, we believe in getting things right the first time. While the Facebook debugger tool is great for fixing mistakes, it is better to set up your links correctly before you share.
Here are some tips to make your Facebook marketing smoother.
Setting Up Proper OG Image Dimensions
The size of the image matters a lot. If your image is too small, Facebook will shrink it into a tiny square thumbnail instead of a big, beautiful landscape image.
- Recommended Size: 1200 x 630 pixels.
- Aspect Ratio: This is a 1.91:1 ratio.
If you stick to these numbers, your preview image will look crisp and clear on both mobile phones and desktop computers. Avoid using vertical images (like those for Stories) for link previews, as they get cropped awkwardly.
Writing Clear Titles and Meta Descriptions
Your image grabs attention, but your words get the click.
- Title: Keep it under 60 characters so it doesn’t get cut off. Make it exciting.
- Description: You have about two sentences to explain why someone should read your post. Focus on the value.
- Consistency: Ensure the page’s title matches what is on the actual blog post. Misleading titles can hurt your trust with your target audience.
If you use the Yoast SEO plugin, you can preview how these will look before you even publish your post. Then, use the sharing debugger tool as a final check.
FAQ’s:
Why is Facebook Showing the Old Image Even After I Changed It On My Website?
This happens because of Facebook’s cache. Facebook saves the old image to load the link faster. You need to use the Facebook sharing debugger and click “Scrape Again” to force Facebook to download the correct image.
How Long Does It Take For the Facebook Link Debugger to Update A Preview?
It is usually instant. As soon as you click the “Scrape Again” button, the tool fetches the latest information. However, if you have shared the link many times already, it might take a few minutes for the update to show up for everyone else on their feeds.
What Are Open Graph (OG) Tags?
Open Graph tags (or OG tags) are small pieces of code on your website. They talk to social media sites. They tell Facebook which title, description, and image to use when your link is shared. Without open graph meta tags, Facebook has to guess.
Can I Debug Multiple Links At Once?
There is a “Batch Invalidator” feature for advanced users, but for most people, you have to debug one link at a time. You paste the URL of the content into the text box and debug it individually.
What is the Recommended Image Size For Facebook Link Previews?
The best image size is 1200 pixels wide by 630 pixels tall. This helps you get the large link preview rather than a small thumbnail.
Conclusion
Technical glitches shouldn’t stand in the way of your content reaching your audience. The link debugger Facebook tool is a simple, powerful way to ensure your hard work looks its best when shared.
By understanding open graph tags and knowing how to clear the Facebook’s cache, you take control of your brand’s appearance. No more missing images. No more broken titles. Just clean, professional posts that invite people to click.
Remember, social media is about connection. If your audience can’t see your content clearly, they can’t connect with it.
At Social Think, we love helping businesses navigate these digital hurdles. From fixing a stubborn facebook link to building a comprehensive strategy that grows your revenue, we are here to help.